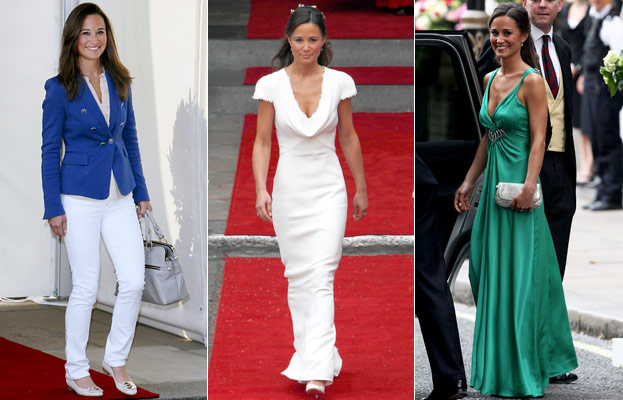
The latest fashion craze is now on the petite sister of Kate: Pippa Middleton. She gained world wide interest as she graced television screens on the Royal Wedding of Kate and William.
Her first appearance of the day was in a stunning ivory dress by Alexander McQueen later followed by a emerald green dress with diamante detail under the bust.
She created a huge buzz in social media and was a trending topic on twitter. I defintely think she's a style icon.
Wednesday, May 4, 2011
Sunday, May 1, 2011
Kate Middleton Wedding Make-Up look
 Who would have though that this royal bride will be doing her own wedding make-up?
KATE MIDDLETON continued the natural feel of her wedding day look by insisting on doing her own make-up for the grand occasion.
You can create the same look!
- First prime your face with a good product to reduce the appearance of pores and fine wrinkles this will also give the foundation an airbrushed effect. Try Smashbox Photo Finish Primer (Available at selected Woolworths branches). If you have any skin issues such as redness or dark circles its important to conceal it. It will show up on photographs if you don't.
- For foundation its important to use photographic products to reduce any shine and to provide the ultimate coverage as camera flashes tend to highlight flaws and washout the colours.
- Match your foundation to your jawline and apply it in soft circular motions with a foundation brush or beauty blender. Make sure you blend the area under your jaw as well. You want to look natural without any streaks.
- Use a professional or high-end powder to set the foundation and to make it last all day.
- Now use a small angular brush to fill in your brows, I prefer using a matte shadow over using an eyebrow pencil. Pencils are made from a wax substance and will shine and smear. It also looks very unnatural to have drawn in lines. Powder is subtle yet effective.
- Use a shadow in the same shade as your hair or natural brow hair colour, dap the brush very gently in the shadow and tap the excess off. Start by filling in the inner part of your brow, only stroking it gently along the hair and not directly on to the skin. Do the same on the other brow then fill in the outer parts with the remaining shadow. The reason for this is to have a natural look, you will only need a little shadow for the outer parts and using more will be too harsh. Use clear mascara over the brows to set the powder.
- To create the soft smokey eye effect that Kate has you will need a grey/brown matte shadow and a soft nude colour. Apply the brown from the outer parts of your crease inwards, creating a V shape. Leave the base of your eyelid and your upper lashline clean for now, blend out the colour not any higher than the fold of the crease. Using the lighter shade apply the nude colour from the lashline meeting the brown shade at the crease, blend it out. Highlight your tear-duct and under brow area with a soft shimmer colour to enhance the eyes.
- Take a black matte shadow and using the angular brush again, draw a line right on your upper lashline outwards,staying clear from the tear duct. Take a soft fluffy brush and blend the colour out to soften the line and make it natural. You will draw the same line in the lower lashline.. Apply a black mascara that is waterproof.
- For your cheeks use a matte rosy pink blush on the apples of your cheeks like Kate did, not too much. Just enough to look natural.
- If you want to ensure that you're make-up will stay fresh and last the entire day without smudges and smears use MAC Fix+ setting spray.
- Use a matte lipstick in 2 shades lighter as your blush colour, Kate went with a very soft pinky colour that is hardly noticeable. Very natural and beautiful.


And there you have it! A natural wedding make-up look inspired by Her Royal Highness The Duchess of Cambridge.
Friday, April 29, 2011
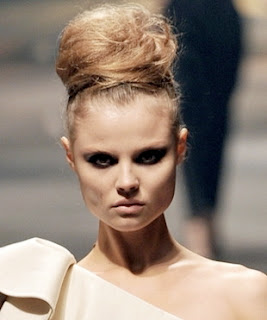
Hair How to: High Bun aka Birds Nest Bun
The High Bun
This is a new hair trend straight from the runway. It can be worn messy or sleek.
How-to: Keep your hair simple (and out of the way!) with a flirty bun. Skip washing today and slick your hair back into a high, tight pony. Twist it into a bun, then secure with an elastic. Gently tug the edges of the bun outward to make it appear fuller. Smooth flyaways with a strong-hold hairspray. If you want the birds nest look, back comb your pony and proceed as above. You dont have to be neat and precise, this whole look is meant to be messy and untamed.
Have fun!
source: seventeen.com
Thursday, April 28, 2011
How to: Linen Closet
If like me you don't have a designated area for your linen and bathroom supplies then this is for you. If you already have a space for it then this might inspire you to reorganize it and make it pretty. I will definitely take this on as my next "DIY" task.
This is an easy step by step guide to help you.
Here is a neat idea for a laundry cabinet made from an old TV entertainment center. If you have upgraded to a flat screen TV, don't toss that entertainment center to the curb just yet. Instead, reinvent it as a handy laundry cabinet. All you need is a little paint and extra wood. Keep all your laundry supplies organized and within easy reach with this make-shift entertainment center turned laundry cabinet.
Next few tips are for those who want to unclutter it.
Wherever you choose to keep your linens, the organizing principles are the same: Shelves and drawers should be clean and freshly painted or lined (unfinished wood can stain the fabric over time). You can fold linens to fit wide or narrow spaces. If the shelves are adjustable, set them at the various heights indicated below. If the setup in your closet or cupboard is inflexible, use baskets, plastic bins, dividers, or plastic-covered wire shelving to create customized surfaces and spaces.
This is an easy step by step guide to help you.
Here is a neat idea for a laundry cabinet made from an old TV entertainment center. If you have upgraded to a flat screen TV, don't toss that entertainment center to the curb just yet. Instead, reinvent it as a handy laundry cabinet. All you need is a little paint and extra wood. Keep all your laundry supplies organized and within easy reach with this make-shift entertainment center turned laundry cabinet.
- Select an entertainment center that is still in good structural shape. Dings and scratches don't matter, since you are going to paint it. But it shouldn't be excessively wobbly or falling apart
- Remove all the doors and hardware from the front of the cabinet. You can keep existing shelves in place. Remove the cardboard backing of the entertainment center and replace it with a piece of 1/4 inch wood paneling, cut to size. This will provide a sturdy back to the cabinet and help brace it.
- Add a wooden shelf across the opening where the TV used to sit
- Prime and paint the entire cabinet in a color of your choice. Oil or latex paint will work. Let it dry overnight
- Attach an iron bar in the tall opening where the AV equipment was stored. You can hang garments here to air dry
- Purchase some matching wicker or linen baskets to store laundry supplies. Tuck them into the existing open shelves of the cabinet.
Next few tips are for those who want to unclutter it.
Wherever you choose to keep your linens, the organizing principles are the same: Shelves and drawers should be clean and freshly painted or lined (unfinished wood can stain the fabric over time). You can fold linens to fit wide or narrow spaces. If the shelves are adjustable, set them at the various heights indicated below. If the setup in your closet or cupboard is inflexible, use baskets, plastic bins, dividers, or plastic-covered wire shelving to create customized surfaces and spaces.
- Sheets and TowelsA shelf height of about 10 inches is good for sheets. Keep sheets of the same kind (queen fitted, for example) in stacks together, or sort sheets into sets (flat, fitted, and pillowcases) for each bed. Allow about 12 to 16 inches of shelf height for towels; organize them by size or by the bathroom they'll be used in.
- Comforters and BlanketsBulky comforters, wool blankets, and extra pillows may need 18 inches of shelf space. Stack these linens at the top of the closet, since you probably only reach for them a few times a year. Store blankets and comforters in zippered bags to keep them from getting dusty. A trunk, a chest, or a box that slides under the bed is also a good storage solution.
- Table LinensSets of napkins should always be kept together; wrap each set loosely in a sleeve of clear cellophane to keep them organized and easily identifiable. Tablecloths can be folded flat or hung on sturdy good-quality hangers (but not on flimsy wire ones).
- Antique LinensAntique linens should be professionally cleaned and packaged in acid-free tissue paper, which helps keep fabric from yellowing. Depending on their shape and size, they may be stored folded, hung, or rolled on cardboard tubes.
- LabelsYou should never have to unfold something to find out what it is (and when they're properly folded, fitted sheets are impossible to distinguish from flat). Take a few minutes to tag shelf edges, using adhesive labels or card holders
- Pest PreventionCedar blocks help deter moths when tucked into drawers or placed on shelves where linens are stored. You may also want to use sachets to add a subtle fragrance to linens.
Do You Know?Using sachets to add fragrance to linens is a custom that dates back hundreds of years to when brides were given a trousseau of fine linens meant to last a lifetime. The young women were also often given a chest or armoire to keep them in.
source:marthastewart.com and wiki.
Wednesday, April 27, 2011
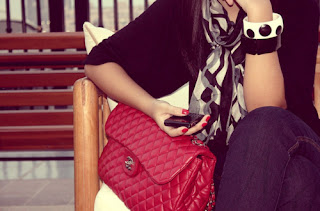
The Clutch Bag
Things to know before you buy:
Unconventional Textures : Gone are the days of clutch bags made of satin, velvet, cotton etc. Now a lady of 21st century needs some unconventional textures. Clutch bags made of crochet materials and knitwear are most sought after. Some clutch bags with innovative tie dye effects or patchworks effect and studded with pearls are here to make you most fashionable.
Latest Colors : Come out of the realm of brown, navy, black, white etc. They were suitable colors for your mother in her youth. Show your metal and pick the latest and bizarre colors. Try taupe or tan for some exciting look. Some of the best colors of 2009 by Pantone such as vibrant green, fuchsia red, dark citron, super lemon have come up with one of most luring clutch bags.
Discussions about colors and textures apart, to make the most of a clutch bag you need to look out for some other things too. Watch out :
Never go out for shopping with a clutch bag. Its limited place will never allow you to carry your various picks. Remember, it is meant for fashion only. Thus it is a bag of parties and dinners only.
Never stuff your clutch bag excessively. Its heavier look may mar its fashion value. Remember, it is not something you can thrust your vanity box into. Do all your makeup at home only.
Thus never carry anything more than your car keys, cellphones, some cash, debit/credit cards and a small diary. As making it heavier would be problematic.
However, if you can't afford to stay away from your lipsticks, perfumes and combs then you can buy a super sized clutch bag. It is more spacious than the more popular palm sized clutch bags.
Always choose a clutch bag which contrasts with your fashion apparel but matches your footwear. Thus if you are in a light colored womans clothing, then choose a deep colored clutch bag. Be careful that your bag matches your footwear. Just think wearing a red dress along with a metallic clutch bag and a metallic footwear
source:www.fashionproducts.com
Subscribe to:
Posts (Atom)


